Introduction
Depraved Sense is an open-source NSFW framework for Project Zomboid. Looking to innovate in crucial areas, and provide tools for modders to work with. This documentation will serve as a guide on how it works, and how to use it!
The framework itself is heavily Work In Progress. Expect things to break, and libraries to change in the long run.
Keep in mind that this document expects that the reader knows the basics of Lua scripting, it isn’t mandatory, but it will improve your understanding while reading it.
Although this can be used as a guide to start modding NSFW mods, it is better refer to the main hub of Project Zomboid modding for guidance. The PZWiki!
This document will only teach the core feature of the framework. A lot of how it works has been set aside in order to keep things simple. It is recommended to read the source code to get a better understanding on how everything works.
The guide itself was written in mind that the reader would start from beginning to end, but there is no right order to read it. You can pick some references here and there, or even go straight to the part you’re interested. Go, and have fun.
This documentation is based on version 0.2.x of Depraved Sense.
FrameWork Considerations
Unlike MANY mods out there on Project Zomboid, Depraved Sense doesn’t have global values (aside from registries.lua). This is because global values are inherently slow to index on Project Zomboid, and often leads to tech debt in the longer run. So, you won’t find any singleton value containing every single piece of code of the framework. What Depraved Sense does instead, is use modules to keep code organized, and independent.
You will often need to require a specific module in order to use its code. For example, let’s say we want to access the util module TimerManager to create a timer. We would use require to get access to the module and use its code.
---Requiring our target module.
local TimerManager = require("DepravedSense/Utils/Time/TimerManager")

---A simple function that prints on the screen once called.
local function on_timer_end()
    print("Timed!")
end

---We then create a task with that function, which will be triggered in 2 seconds.
TimerManager.create_and_add_task(2.0, on_timer_end)
Annotations
If you take a glance at the code of Depraved Sense, you will notice that there are a lot of @param and @class comments. Those are annotations serve to assist programmers by offering context in what types the values are, and autocomplete during code. These are often analyzed by Lua LSPs like EmmyLua and LuaLS. It is highly recommended to install such LSP for your workspace, alongside Umbrella.
You can find the guide of its annotations right here.
Your own mod folder.
This guide assumes that you already have in hands a proper formatted mod folder to work with. If you don’t have one, you can learn it at PZWiki.
And don’t forget to add depraved_sense_nsfw on the require field of mod.info so your mod loads after Depraved Sense.
Don’t Be Afraid To Ask For Help!
No matter how skilled of a person you are, you will always deal with trouble. Things can go wrong, and sometimes be extra confusing. In cases where you feel lost, and without any sign of direction. DON’T BE AFRAID TO ASK FOR HELP! There will always be someone that will be willing to help you in your specific case.
You can either go at the LoversLab Forum, or Depraved Sense own Discord to ask for assistance!
About AI
It is often popular for beginners to let AI code for them. And, although Depraved Sense is not against AI, use on development, it is completely against vibe-coded mods with no regards with how everything works. These types of mods often cause more trouble at the end of day, with bugs appearing out of nowhere, and making maintenance a complete nightmare.
If you are a beginner, and don’t have a clue on how to code, use AI to learn how to, instead of doing it for you. Researching how a thing are done, or even using it to track down bugs on your own codebase is perfectly fine.
You can still use AI to help you alongside development, but keep in mind that AI by default has no idea how Zomboid works. It is far more difficult managing it, and giving context to it for beginners than to people already used to the tool. So, if you ignore this warning, and your own mod explodes in your face as soon as things break down, don’t say we didn’t warn you.
Client, Server & Shared
To be able to make the framework multiplayer friendly, Depraved Sense was coded with Client, and Server in mind most of the time. Which resulted in a code base scattered around Client, Server, and Shared workspaces. Most modders from zomboid are accustumed to only ever use the Client workspace for their own mods, so it can be a shock for someone needing to learn a whole lot just to do things. But don’t worry, Depraved Sense Already does most of the heavy lifting for you in most critical parts, so you won’t need to do much to make things working.
However it is still good practice to know exactly where to store your code, and how to handle a few networking problems.
For starters, Project Zomboid loads lua folders in a specific order.
Singleplayer:
Shared -> Client -> Server
Multiplayer (Client):
Shared -> Client
Multiplayer (Server):
Shared -> Server
Keep in mind that SinglePlayer does not create a separate server instance like most games that have online multiplayer. Instead, Zomboid creates a whole state for SinglePlayer that treats both Client and Server as the same thing. This single fact alone makes it difficult to check if some feature works on Multiplayer or not.
When creating your mod the code of it often fall into these occasions.
Client, when it is related to the UI, Sounds, and in general what you seen on the game’s screen.
Server, when you want to do anything remotely to gameplay and data. Like changing item’s stats or changing the player’s current state. This is because almost all changes occurring on the Server will immediately sync all other Clients.
Shared, when the code itself is more of a library or util for both Client and Server. That is because Shared is loaded by both sides no matter the occasion or state of the game.
For more information on how to handle Networking code, check the PZWiki’s page on Networking.
Depraved Data
To facilitate the process of syncing custom data of characters between Server, and Clients on Project Zomboid. Depraved Sense has a data handling util called Depraved Data. Which is the main way of altering Depraved Sense values of characters.
Let’s assume we want to check how much libido a character has. We can simply do this example:
---We require the DepravedData module to get access to its utils.
local DepravedData = require("DepravedSense/Util/DepravedData")

---Get the libido value of the character. Assuming of course we have a `character` in scope.
local libido = DepravedData.get_libido(character)

---And now we print out on the console for us to see the value.
print(libido)
Let’s say we have a character, and we want to change their libido stat every time they hit a zombie. To achieve that we can do this:
local DepravedData = require("DepravedSense/Util/DepravedData")

---The amount of libido we want to add. In this case is 2%.
---For those wandering, in code we represent percentages with broken 1 values.
---0.5 = 50%, 0.2 = 20%, and in here, 0.02 = 2%
local libido_to_add = 0.02

---@param zombie IsoZombie
---@param attacker IsoGameCharacter
---@param body_part BodyPartType
---@param weapon HandWeapon
local function on_hit_zombie(zombie, attacker, body_part, weapon)
    ---We add the libido on the impact
    DepravedData.add_libido(attacker, libido_to_add)
end

Events.OnHitZombie.Add(on_hit_zombie)
Now, every time a player hits a zombie, their own libido will increase by 2%!
Keep in mind that you can only alter data if you’re on the Server side. That is to avoid command duplication coming from multiple Clients, and cause a lot of chaotic behaviour (also avoid cheats). While you can still alter the data on the Client, it will quickly be reflected to the Server's own value, and won’t sync with other Clients.
Belly Inflation
As some people might be aware of, Depraved Sense does support the ability to change the character’s belly size visually. You can easily do it by using set_belly_inflation().
local DepravedData = require("DepravedSense/Util/DepravedData")

---Sets the belly inflation to 50%
DepravedData.set_belly_inflation(character, 0.5)
When done, the character’s own belly will reflect the inserted percentage.
Note: It is highly endorsed to check the source code of DepravedData, as it has some special functions related to it that you might find neat! However, this module is still pretty much W.I.P; some changes can be expected in the future, and other functions can get deprecated. Always keep in touch with Depraved Sense patch notes!
Animation Bus System
Like many NSFW frameworks, Depraved Sense has its own animation system in order to play animations with characters. However, in order to have a system able to handle the complexity that is Project Zomboid, a simple linear system that goes from stage1, stage2, stage3… would not suffice.
So, Depraved Sense has a powerful node based animation system that can support transitions, custom animation events, and the ability of having multiple modules that can link each other. This system allows us to create highly dynamic animations that can change based on player’s actions mid scenes. If you ever worked with other node based systems in other major tools such as Unity or Godot, you might get familiar with it.
You may also find out that most of this system’s logic is Server sided. This is to make sure the animations can stay in sync (most of the time) with all clients.
If you are coming from a space like Skyrim or Palworld where its animation systems are mainly tag based, you might feel overwhelmed by it, as tags aren’t a main point. But stay calm, this system is way simpler when you learn the basics.
The Graph
The Graph is the main storage, and loader of the entire animation system. They store all the necessary data for scenes to play out. Along if constructing its elements in a way the mod can navigate through.
Normally you will never need to read its data directly, as Depraved Sense already reads all its data for scenes. But if you ever need to get a specific information of it. You may do it with this example:
local Graph = require("DepravedSense/AnimGraph/Graph")
local stage = Graph.find_stage("stage_name", "module_name")
Reminder that every value you try to find on the Graph can return nil. So in this example stage will need to pass through a check first, before doing anything with it, or else you might deal with errors.
---In this section we verify if `stage` actually exists or not.
---If it does, we print out its id.
if stage == nil then
    return
else
    print(stage.id)
end
WARNING: It is highly endorsed to only EVER read values of cells through the graph, and NEVER modify them. Alterations on its data can result in errors, and undefined behaviour.
Actors & Pawns
Before we get deep into the system, and untangle how all this works under the hood. It is VERY important to differentiate what our main performers for our system are responsible for. Which are Actor and Pawn.
Pawns
Pawns are essentially the blueprint of what we expect for a character to be. What they are like? Are they female? Which type of character are they? Zombie, Player or Animal? What offset do they have? These are all the questions that a Pawn should answer. Without them we would need to guess what type of character is allowed under a certain scene, and create extra code just to figure out in real time. The Pawn saves us from doing that.
A Pawn is also pure data. They don’t have any imbued function in them whatsoever.
Structure of a basic Pawn:
---@class DS_AnimPawn
---@field is_female boolean
---@field has_penis boolean | nil
---@field active boolean | nil
---@field pos_offset DS_AnimPosOffset
---@field angle_offset number
---@field animtype string

---@class DS_AnimPosOffset
---@field x integer
---@field y integer

local pawn = {
    is_female = false,
    has_penis = false,
    active = true,
    pos_offset = { 0.0, 0.0 },
    angle_offset = 0.0,
    animtype = "player",
}
Anim Types
A Thing to note, the value animtype refers to the main AnimSet of a given character. This is mainly important when dealing with animals, as even if their class is all IsoAnimal, they use different types of AnimSets like pig or cow.
Actors
Now, Actors are the REAL deal. Unlike Pawn, an Actor is an object interlinked with a character instance from the game. They have helper functions that allow you to play characters animations, and apply an offset to them if inserted. They are also the main objects that an AnimBus carries over. We haven’t explained what the AnimBus is yet, but keep in mind that Actor is the main object most of the time.
Here’s the public values you can expect from an Actor:
---@class DS_AnimActor : ISBaseObject
---@field character IsoGameCharacter
---@field online_id number        Will match the online_id of DepravedSense not Zomboid own online_id
---@field is_female boolean
---@field has_penis boolean
---@field active boolean
---@field character_type string
---@field animtype string
---@field animbus_reference DS_AnimBus | nil
---@field animbus_id string
---@field in_animbus boolean
---@field bus_seat integer
---@field speed number
---@field max_speed number        Default: 1
---@field speed_drain_rate number Default: 0.008
There may have other private values here, but its best that you check the Actor module code for reference of its functions at “lua/DepravedSense/AnimGraph/Actor.lua”
Active or Passive
You may notice that both Actor and Pawn have an active value on them. This value determines if a character is active or passive on the animation system. They are responsible for telling how much control an Actor has over a scene. An active Actor has complete control, it can dictate the speed of a scene, and decide which direction the animation should go. Passive Actors don’t do much, and they are often at mercy of active Actors. However they still posses some control in very specific circumstances, like struggle for example.
WARNING: Keep in mind that once an Actor is created, the character attached to it will essentially be locked in place every time the Actor updates. So, don’t go around and create Actors like there is no consequences.
Cells
Animation Cells are essentially the main building blocks of the entire Graph. With them in hands we can create complex structures and paths that allow extra dynamic animations to be possible. They can connect with each other through Roads that links their Gates, and deduce what conditions are needed to be met in order for scenes to continue.
There are four types of cells in the entire graph, with each having a specific task. Being Ticket, Depot, Stage, and Phase.

Gates
Gates are doorways that every cell has in some capacity. They are used to connect each Cell with another. There are two types of Gate, GateEntrance and GateExit. They can only be connected with each other but not if they are the same.
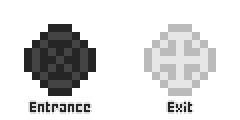
GateEntrance <–> GateExit, GateExit <-x-> GateExit, GateEntrance <-x-> GateEntrance.
Effects
GateEntrance has an special trait called Effects. They are essentially lua functions that are called with every Actor in a scene when a Cell is entered.
Here’s a body of a function that would be called when an effect is triggered:
---This function doesn't necessarily do anything to the character itself,
---but anything can be written in here in order to achieve certain effects,
---or if you want it to, do completely different features outside of actors.
---@param actor DS_Actor
local function effect(actor)
    ---Will print which is the hurt sound of the character.
    local character = actor.character
    print(character:getHurtSound())
end
Ticket
A Ticket is a Cell that is made purely as an entrance for the Graph. They are starting points where every scene begins. This Cell has only a GateExit.

Depot
A Depot is the reverse of a Ticket. They serve as an exit way out of the Graph, and liberate Actors from their scenes. This Cell has only a GateEntrance.

Stage
Now Stage is an important one. Their job is to define what are the requirements for a scene to happen. Which actors are needed, setting their offsets, and being a container for Phases to specify which animations will be played. You can think of each Stage being a specific pose for each scenario. This Cell has both GateEntrance and GateExit.
A Stage can also define which Phases are more going to be used as start positions.

Phase
Phase is the most significant Cell on the Graph. They specify which animations will be played, and by which actor. They can also define which animation events are going to be triggered at any given time. Unlike Ticket, Depot, and Stage, they don’t live on the global environment of the Graph. Instead, they are stored inside Stage Cells. This Cell has both GateEntrance and GateExit.

Roads
Now, that we know what Cell is. We need a way to connect them with each other, unless we want them floating around doing nothing. And to do we use a Road that creates bridges across them.
A Road is essentially a path that connects a GateExit to a GateEntrance in a one-way direction. With it we can connect two Cells along their gates.
Conditions
However a Road is not a free pass through, each Road can have multiple conditions bound to it. And these conditions can be coded by inserting a Callback (a callback is a function that is passed as a value). Here’s an example of an array of conditions:
local conditions = {
	---@param animbus DS_AnimBus
	function(animbus)
        ---In here is a code that picks the first actor, and checks if they are a female, and doesn't have a penis.
		local main_actor = animbus.actors[1]
		return not main_actor.is_female and not main_actor.has_penis
	end,

    ---@param animbus DS_AnimBus
    function(animbus)
        ---A Code that checks if the bus is at 50% of its speed.
        return animbus.current_speed > 0.5
    end
}
Every condition will need to be true for the road to be passable, and if not, the road will remain blocked. You also might see that we are using an AnimBus here; we will soon explain what this is, but for now keep in mind that they guide our animations by storing our Actors.
If a Road has no conditions applied to it. It will remain free for everyone to pass through. Though it is recommended to always create conditions to avoid complications.
Transitions
Each Road can have a transition animation imbued into them. These animations will play once, when the road gets used up. These transitions can too have its own animation events, mainly used to emit sounds of characters or trigger custom logic.
Actor Reorder
In some VERY specific circumstances, you might encounter situations where you want to connect two Stages together with a Road. However, both Stages don’t match its actors’ ordering. With Stage A having a player actor at index 1, and zombie at index 2. While Stage B is in reverse order, zombie at 1, and player at 2.
In these situations we can imbue an actor reorder, which can switch actors positions with each other. In here we can have this simple reordering table.
local reordering_A = {2, 1}
-- In here reordering_A will make actor_1 go at the second position,
-- and actor_1 at the first position

local reordering_B = {3, 1, 2}
-- Now in here, this reordering will pick actor_1, and put at second,
-- actor_2 at last, and actor_3 on first.
Keep in mind that these reordering tables should be used during the creation of an Animation Kit. Which we still need to explain, but we are getting in there.
The Bus
At this point, we have a good grasp on the main elements of the Graph itself, however on its own the Graph does nothing, it is just a glob of data waiting to be used. Which finally comes the time to present, the big boi, the machine, our precious conductor, AnimBus!
The AnimBus is the main engine of all animations of Depraved Sense. Their job is to store all necessary actors of a scene, sync them accordingly with the scenes (At least try to), and of course play the animations.
To make sure that multiplayer can be possible with Depraved Sense, the AnimBus lives on the server, and makes sure that all clients are on the same page when it comes to animations. The AnimBus also can have UNLIMITED actors. It can have 2, 3, or even 6 if you’re crazy enough to do the work for it.
For reference this is the body structure of an AnimBus:
---@class DS_AnimBus : ISBaseObject
---@field id string
---@field actors DS_AnimActor[]
---@field actor_join_queue DS_AnimActor[] W.I.P Will allow actors to join the bus mid scene.
---@field actor_exit_queue DS_AnimActor[] W.I.P Will allow actors to leave the bus mid scene.
---@field current_cell DS_AnimCell | nil
---@field current_phase DS_AnimPhase | nil
---@field cell_loops integer          Number of loops on the current cell
---@field phase_loops integer         Number of loops on the current phase
---@field _looped_actors boolean[]
---@field current_speed number        A Speed value percentage that goes from 0.0 to 1.0
---@field integrity number            This works as a life of a Bus. if it reaches 0, the bus crashes
---@field integrity_max number        The max integrity a Bus can have. Calculated by the amount of actors. The more actors the greater its health will be
---@field _integrity_per_actor number How much health does a single actor provide to the Bus.
---@field interrupted boolean
---@field stopped boolean
---@field anchor_x number
---@field anchor_y number
---@field anchor_angle number
---@field has_anchor boolean
---@field anchor_actor integer        Which actor is being used as an anchor. -1 means no one.

---The default values of a single bus during its creation.
---Will change after initialization.
local bus = {
	id = getRandomUUID(),
	actors = table.newarray({}),
	actor_join_queue = table.newarray({}),
	actor_exit_queue = table.newarray({}),
	current_cell = nil,
	current_phase = nil,
	cell_loops = 0,
	phase_loops = 0,
	_looped_actors = table.newarray({}),
	current_speed = 0.0,
	integrity = 0.0,
	integrity_max = 0.0,
	_integrity_per_actor = 10.0,
	interrupted = false,
	stopped = false,
	anchor_x = 0,
	anchor_y = 0,
	anchor_angle = 0,
	has_anchor = false,
	anchor_actor = -1,
}
The logic
First thing to note is that AnimBus was designed around animation loops. That decision makes sure that animations are played correctly, and are not cutoff in game unless forced to do so. It will only make decisions when it is created, and when a scene loops.
So, let us watch how an AnimBus acts with a few prepared graphs:
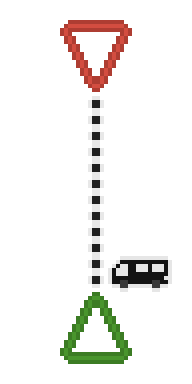
This is a very barebones scene with a single Ticket, Depot, and a Road. We’re using it just to see how things goes. In here we can see that the very first location that an AnimBus will be, is at a Ticket. Once the bus finishes starting it will immediately check all the available roads connected to the Ticket exits.
In this case the Road has no conditions imbued to it, so its always truthy for us. Which makes our bus move along its path. If the path had any transition animation put in it, it will play it for each assigned actor.
Note: In this specific case, thanks to the limitations of Zomboid, no animations will actually be played here. Those require the need of at least one Stage for animations to work. This example is just for learning purposes.

Once the bus reaches the depot and every actor finished their transition animation, the bus will stop, and release all the actors inside of it.
It will also apply every effect the cell has in its GateEntrance for each actor.
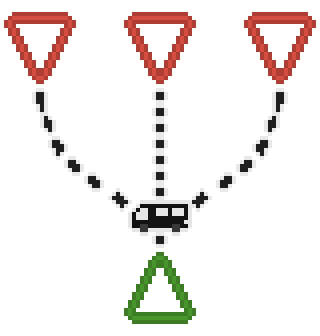
In here we have a similar situation like the previous example, however we have three Depots instead of one. And like previous scenario each road is truthy. When the AnimBus sees that it has multiple available paths to follow, it will pick a random one from its choice. In this example, it decided to go for the righmost path.

Now, let’s try something with a more complete design.
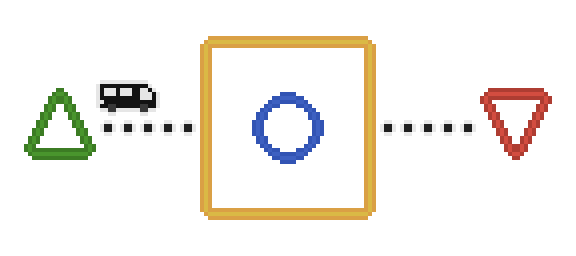
This example now has the simplest kind of scene constructed, including a Stage with a single Phase in it. This time, we will make only the Road leading to the Stage truthy, while leaving the Road to the Depot with a simple condition.
local conditions = {
    ---@param DS_AnimBus
    function(animbus)
        ---This code will only let the road be free if the AnimBus animations loop 4 times
        if animbus.cell_loops >= 4 then
            return true
        else
            return false
        end
    end
}
At first the bus will check the Stage requirements, and decide if its stored Actor list is compatible with what the Stage requires. If not, the bus will not accept the Road leading to it, but in this case both the AnimBus and Stage have the first actor to be the type of player.

Now, once arrived on the Stage the bus will pickup one Phase from it, and use it as an animation source for its actors. As we discussed earlier Stage can have multiple Phases, but to keep it simple we will keep it one for now.
Once the actors looped their animations, the bus will once again check the roads in their disposal. And on this occasion, the single Road has our specific condition included, and right now it doesn’t pass since our AnimBus loop count is at 1. So, it stays in place, and let the animations play one more time.
Once the AnimBus has looped 4 times, the road will finally be available to the AnimBus, which will let it finally pass by, reach the Depot, and end the scene.

With this, we essentially created a simple animation that loops 4 times, and ends. We could even improve it by adding Transitions on roads to make things smoother.
The Phases inside our Stages
Now, let’s move our eyes to another place. Suppose we have a common Stage like no other. However, this one has 3 different disconnected Phases.
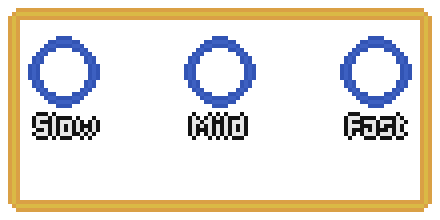
Normally, once an AnimBus arrives into the Stage it will check the Phases it has. And on this case it will randomly pick a Phase, position itself on it, and play its animations. With this you can in theory create scenes that can have Variant animations.
But what if we didn’t want that? What if these 3 phases had specific objectives? Let’s say we name these Phases: Slow, Mild, and Fast. Now we don’t want the AnimBus to simply arrive at the Stage, and out of nowhere stop at the Fast Phase.

Thankfully, Stage can look which Phases can be treated as start values (also called ignitions), which makes a Phase have priority over others. Using this to our favor we can set Slow as a start, and force the AnimBus to always start at it.
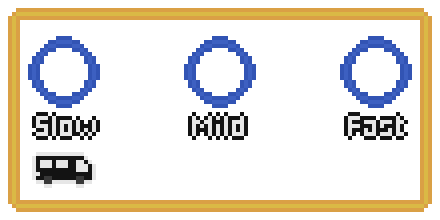
Great! Now we can assure that the radomness won’t be such a problem. However, these Phases are still disconnected. To change this we can connect them in a one way format, with each Road having a specific condition based on the AnimBus speed.
local conditions_to_mild = {
	function(animbus)
		return animbus.current_speed >= 0.40
	end
}

local conditions_to_fast = {
	function(animbus)
		return animbus.current_speed >= 0.75
	end
}
With it, the AnimBus will dynamically switch Phases as it updates its values, and it loops. In this case, the selected animation changes as the current_speed value grows.

Note: the animbus.current_speed is not the animation speed itself, but a value that Road can use in its conditions.
Calling the Bus
Considering that you got to this point, you have a good grasp on how the AnimBus works on itself. However, there is one thing remaining, and that is how to call an AnimBus, so we can play our scenes!
Currently there are two ways of utilizing the AnimBus through the API. One is calling an AnimBus on the Client with Buscaller.lua, and the other is directly creating one in the Server side by using the BusManager.lua. Let’s examine those methods.
Client Method
Since the AnimBus lives on the Server. We can’t directly create one for use. However we still can call for its creation utilizing the module BusCaller.lua. In this example, we can make a simple code that calls an AnimBus whenever a player tries to reload their weapon.
local BusCaller = require("DepravedSense/AnimGraph/BusCaller")

-- These are the necessary addresses to be able to find out Ticket in the Graph.
-- We still didn't explain the reason for these, but they will make sense when
-- we explain AnimKits. Just keep in mind that they are important.
local TICKET_ID      = "yourticket_id"
local ANIMKIT_MODULE = "youranimkitmodule"

---@param player IsoPlayer
---@param weapon HandWeapon
local function on_press_reload_button(player, weapon)
	-- To call a bus, we need a list of characters, so in here we wrap the player
	-- into a list.
	local character_list = { player }

	-- This will attempt to call a bus on the server side. And return a boolean
	-- value indicating whether it was able to send its command.
	local success = BusCaller.call_bus_with_characters(character_list, TICKET_ID, ANIMKIT_MODULE)

	if success then
		print("Called Bus!")
	else
		print("Failed to call the Bus...")
	end
end

Events.OnPressReloadButton.Add(on_press_reload_button)
If everything goes right, the player shall enter in an AnimBus at the exact specified Ticket, and execute the animation scene.
Server Method
Calling the bus on the Server is way more direct than on the Client since we are already on the same environment that the AnimBus lives on. So, instead of using BusCaller to handle commands for us, we can use the BusManager, and create a bus ourselves. PS. The BusManager.lua is a module that stores and updates all busses.
local Actor = require("DepravedSense/AnimGraph/Actor")
local BusManager = require("DepravedSense/AnimGraph/BusManager")

local TICKET_ID      = "yourticket_id"
local ANIMKIT_MODULE = "youranimkitmodule"

---In here, on multiplayer, a bus will be created as soon as a player processes an
---action.
---@param action string
---@param player IsoPlayer
---@param args table
local function on_player_process_action(action, player, args)
	-- In here, it's necessary that we create Actors based on the characters
	local player_actor = Actor:new(player)
	local actor_list = { player_actor }

	BusManager.create_bus(actor_list, TICKET_ID, ANIMKIT_MODULE)
end

Events.OnProcessAction.Add(on_player_process_action)
Recap
So, that was a whole lot of information wasn’t it? Let’s do a recap to check what we learned.
We know that the animation bus system of Depraved Sense is a node based one, and that it has four types of cells Ticket, Depot, Stage, and Phase. Each with its own job, and traits that differentiates between each other. Then we can connect them with Road, that has specific conditions to be passthrough. And finally after we have build our scene with these elements, we call an AnimBus to interpret, and drive dynamically through all the elements, following its own loop rule. Until it finally arrives at a Depot, which it releases every Actor it has.
Got that locked in? Great!
With your powers combined!
With this knowledge at your hands, you can create intricate dynamic animations that react with the game without compromising the animation’s quality! Capable of creating either SFW or NSFW scenes with multiple actors with ease. Here’s the visual representation of the base Self-Pleasure scene as good example of this system being used at its best!
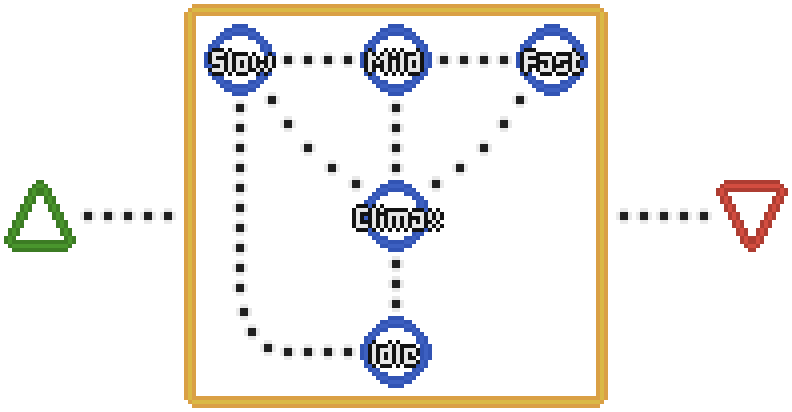
Of course, there are still the hard comings of creating your own scenes. Thinking of how things are going to get connected, how they change the final outcome, and the need to adjust the actors offsets once in a while makes things complicated. But, it is better than using Zomboid XMLs directly, and having a headache trying to make sure you got things right.
Animation Events
Animation Events are flags that are set during an animation, and triggers special logic on the game. Depraved Sense has its own way to simplify the use of them through its AnimEventManager module. Here you will learn how to create very basics Animation Events.
One important thing to keep note of, the animations events are separated into two parts, the Client side, and the Server side.
Client events are only supposed to be used when it comes to user interface, sounds, or anything graphical on the user’s end. There are some exceptions to this rule of course, as zomboid has a weird netcode way of handling things, but for the most part keep Client for graphical logic.
Server events are used when you want to change something data related. Like changing the character’s data, calling functions of objects, and overall just making every logic possible. This is to make sure that things stay in SYNC with all Clients connected to the session.
There are three types of events to register. living, zombie, and character. living is for characters that are ‘alive’ in the game, meaning players, and animals. zombie is for… well, zombies. character is for events that will trigger for every character.
Here’s how you can add your own event.
---First we require the main module so we can add our own events.
local AnimEventManager = require("DepravedSense/AnimEvents/AnimEventManager")

---This is your event name
local event_name = "your_unique_event_name"

---This function will check if the character is a animal, and print on the console.
---@param character IsoPlayer | IsoAnimal
---@param value true | string | number
local function on_character_pleasure(character, value)
	local is_animal = character:isAnimal()
    print(is_animal)
end

AnimEventManager.add_living_client_event("your_unique_event_name", on_character_pleasure)
This code adds a simple event on the Client side that prints if an character is an animal, with add_living_client_event. Whenever an animation triggers that value, that logic will happen.
These are the current available functions for you to use, and create your events.
AnimEventManager.add_living_client_event
AnimEventManager.add_living_server_event
AnimEventManager.add_zombie_client_event
AnimEventManager.add_zombie_server_event
AnimEventManager.add_character_client_event
AnimEventManager.add_character_server_event
Inserting Events on Kits
We will soon learn about Animation Kits, but before we do, it’s nice to know that both Phases and Roads have core slots mainly for animation events. And to be able to insert our events in them it is needed to know the format we will use. You can use this example as a reference:
---@class DS_AnimEvent
---@field name string
---@field time_trigger number from 0.0 to 1.0
---@field param string | number | boolean | nil

local events = {
    { -- This event list will be played for actor 1
        {
            name = "EVENT_NAME_1",
            -- When the event will be triggered. 50% means it will trigger exactly in
            -- the middle of an animation.
            time_trigger = 0.5,
            -- Optional. In case the animation event uses an extra value.
            -- in this case, the number `5` will be put as an argument on the callbacks.
            param = 5,
        },
        {
            name = "EVENT_NAME_2",
            time_trigger = 0.1,
        }
    },
    { -- This event list will be played for actor 2
        {
            name = "EVENT_NAME_1",
            time_trigger = 0.666,
            param = 47,
        }
    }
}
Animation Kits
We’ve seen how most of the animation bus system of Depraved Sense works under the hood. But we are still in need to actually building them ourselves. That’s where Animation Kits come to the rescue. They are .lua files that contains the necessary data to allow the construction of an Animation Module for the Graph to read.
An Animation Module is essentially what a treated Animation Kit is after they are loaded. So, to keep thing straight, Animation Kit is the .lua file you can modify, and an Animation Module is that Animation Kit after it’s been loaded.
Format
An Animation Kit has only two obligatory values. VERSION, and module.
VERSION is a constant value that MUST be 1, because this is the value that will signal which format version Depraved Sense will use when reading the data. This ensures that in the future we can have better formats without worrying about getting stuck into a single deprecated format.
module is essentially the unique identification of your Animation Kit. Mainly used to find the kit across multiple other kits. Make sure to make this value as unique as it can be, you can add your own nick on it, define which context it is for, or maybe even insert a random number. Anything goes.
Below it is the simplest form of an Animation Kit.
---@type DS_AnimKit
local animation_kit = {
    VERSION = 1,
    module = "your_unique_name"
}

---It is obligatory to ALWAYS return the animation_kit at the end of the `.lua` file.
return animation_kit
Wait, that’s it? Yes. That’s it.
An Animation Kit doesn’t need any more than this to be valid. Which makes them extremely versatile and flexible in terms of organization. It allows developers to divide their own files, and define which kit is responsible for each part of the Graph. A single file can be a pack for Tickets, another for Depots and Stages, and another only having Phases. Or, if a developer wish to, can create a singleton having everything they need. The choice is theirs.
It is good practice to name the .lua files the same as the module field.
Prints
Print are essentially tables of an Animation Kit that adds Cells to the main global environment of the Graph (which includes Ticket, Depot, Stage, and Road). Phase is separated into its own special type of table called Phase Kit that are only looked inside Stage cells. More into them in Phase Kit
All Prints created in an Animation Kit are then associated with the module of that kit. This will become more important later on.
Tickets & Depots
Ticket & Depot are the simplest tables on the Animation Kit. Ticket only has an id to be set, while Depot can have optional effects imbued to it.
---@class DS_TicketPrint
---@field id string

---@class DS_DepotPrint
---@field id string
---@field effects (fun(actor: DS_AnimActor))[][] | nil

---@type DS_AnimKit
local animation_kit = {
    VERSION = 1,
    module  = "your_unique_name",
    ---This adds tickets to the graph.
    tickets = {
        { id = "YOUR_TICKET_ID_1" },
        { id = "YOUR_TICKET_ID_2" },
    },
    ---This adds depots to the graph.
    depots = {
        { id = "YOUR_DEPOT_ID_1" },
        {
            id = "YOUR_DEPOT_ID_2",
            ---With depots you can also implement your effects. This is optional.
            effects = {
                ---@param DS_AnimActor
                function(actor)
                    ---Will print which seat the actor is located in.
                    print(actor.bus_seat)
                end
            }
        }
    }
}

return animation_kit
This Animation Kit will essentially create two Tickets, and two Depots on the graph.
Stages
Stages, as we explained earlier are our scene setups. In an Animation Kit you essentially need to create a stage from scratch, make sure you set up the right offsets, and all values are set correctly. You can use the example below as a reference.
---@class DS_StagePrint
---@field id string
---@field tags string[]
---@field pawns DS_AnimPawn[]
---@field effects (fun(actor: DS_AnimActor))[][] | nil
---@field anchor DS_AnimAnchor | nil

---@type DS_AnimKit
local animation_kit = {
    VERSION = 1,
    module = "your_unique_name",
    stages = {
        {
            id = "YOUR_STAGE_ID",
            tags = {"test", "just_a_stage"},
            pawns = {
                {
                    animtype = "player",
                    is_female = true,
                    has_penis = false, -- optional value, defaults to what matches to a cisgender character
                    active = false,    -- optional value, defaults to `false`.
                    pos_offset = {x = 0, y = 0},
                    angle_offset = 0
                },
                {
                    animtype = "zombie",
                    is_female = false,
                    has_penis = false,
                    active = true,
                    pos_offset = {x = 0, y = 0},
                    angle_offset = 0,
                },
            },
            anchor = {type = "actor", actor_id = 1},
            effects = {}, -- optional, you can add your effects here.
        }
    }
}

return animation_kit
Roads
As we mentioned before in here, Roads are the bridges between the Cells of our Graph. And in here, there are four types of it mirroring all possible types of connections, TS, TD, SS, SD. (Ticket to Stage, Ticket to Depot, Stage to Stage, Stage to Depot). They define how two fields in a Road find the Cells. from, and to. In those fields you will put the exact id of the Cell you wish to connect based on the Road type.
Here’s an example:
---@class DS_RoadPrint
---@field from DS_CellAddress
---@field to DS_CellAddress
---@field animx string[] | nil
---@field events DS_AnimEvent[][] | nil
---@field conditions (fun(anim_bus: DS_AnimBus): boolean)[]
---@field reorder integer[] | nil

---@type DS_AnimKit
local animation_kit = {
    VERSION = 1,
    module = "your_unique_name",
    tickets = {
        { id = "UNIQUE_TICKET_ID" }
    },
    depots = {
        { id = "UNIQUE_DEPOT_ID" }
    },
    roads = {
        {
            type = "TD", -- TD stands for 'Ticket to Depot'.
            from = "UNIQUE_TICKET_ID",
            to   = "UNIQUE_DEPOT_ID",
            conditions = {}, -- We're leaving this empty to make the Road truthy.
            events = nil, -- Optional. Our animation events if there is an animation.
        }
    }
}

return animation_kit
This simple kit will create a Ticket, and a Depot, then connect them via our Road. Of course you can do more, and add more spices, like adding conditions to the Road to make the AnimBus only drive through it when it is available.
If a Road has an animation in them, the Animation Events that we’re inserted in them will be played.
Phase Kit
As we said before, Phases are the central piece for animations, and thanks to how they are stored, they need their own special case on Animation Kits. So, that leads us to the Phase Kit.
A Phase Kit, is nothing more but a collection of Phases that are going to be inserted inside a Stage. Let’s create one as an example.
---@class DS_PhaseKit
---@field stage string
---@field stage_module string | nil
---@field phases DS_PhasePrint[]
---@field roads DS_RoadPrint[]

---@class DS_PhasePrint
---@field id string
---@field ignition boolean | nil
---@field animx string[]
---@field events DS_AnimEvent[][] | nil
---@field effects (fun(actor: DS_AnimActor))[][] | nil

local anim_kit = {
    VERSION = 1,
    module = "your_unique_name",
    --- First we need create a `stage` where we can store our `phases`.
    stages = {
        {
            id = "test_stage",
            tags = {
                "test",
            },
            pawns = {
                {
                    animtype = "player",
                    is_female = true,
                    pos_offset = {x = 0.0, y = 0.0},
                    angle_offset = 0.0,
                }
            }
        }
    },
    phase_kits = {
        {
            -- The name of the stage we are targeting.
            stage = "test_stage",
            -- optional. In case you are targeting a stage from another module.
            stage_module = "your_unique_name",
            phases = {
                {
                    id = "phase_1",
                    -- optional. Tells the bus to start in this phase.
                    ignition = true,
                    -- The list of animations to be played.
                    -- The actor 1 will play the first animation,
                    -- the actor 2 will play the second, and so on.
                    animx = {
                        "Bob_Your_Animation_Name",
                    },
                    -- optional. Our effects, in this case we aren't using any.
                    effects = nil,
                    -- optional. Our events.
                    events = {
                        {
                            name = "EVENT_NAME",
                            time_trigger = 0.5,
                        }
                    }
                },
                {
                    id = "phase_2",
                    animx = {
                        "Bob_Your_Other_Animation",
                    }
                }
            },
            -- Roads in PhaseKits don't need to have their type set.
            roads = {
                {
                    from = { id = "phase_1" },
                    to = {id = "phase_2"},
                    animx = nil,
                    conditions = {
                        function (animbus)
                            return animbus.phase_loops >= 2
                        end
                    }
                },
                {
                    from = { id = "phase_2" },
                    to = {id = "phase_1"},
                    animx = nil,
                    conditions = {
                        function (animbus)
                            return animbus.phase_loops >= 2
                        end
                    }
                }
            }
        }
    }
}

return anim_kit
Okay, that’s a lot to tackle, let’s try analyzing this carefully.
In here we are first creating a Stage so we have where to put our Phases. Next in out kit we created at phase_kits we specify which Stage we are aiming for, and in this case it the one we created, test_stage. We also can point which module we are referencing, which deserves its own section later, so we won’t explain much of it. Just keep in mind that it searches which module the Stage is in.
Then, in that phase_kit we create our Phases that will be inserted on the Stage. phase_1 and phase_2. We can notice that phase_1 has an ignition value set to true. That tells the bus to prioritize it, and begin the scene through it.
Next, we created the Roads for our Phases with a simple looping condition. In here, these Roads will make the scene switch between the two Phases every time the animation loops 2 times.
You can create multiple kits inside a phase_kits. With each aiming at an specific Stage.
These things often can become complicated, so it’s recommended to have a visual grasp on what you have in mind at hands.
Dependencies
Animation Kits have the ability to reference other modules, and use their own Cells. Which allows for other kits to focus on specific tasks, for example one for creating Stages, and another for connecting them with Roads.
Here’s a good use of it, first we’re going to create two Stages in one Animation Kit, and leave both of them disconnected. We’re calling its module “stage_setting_test”.
test_stage_kit.lua
local anim_kit = {
    VERSION = 1,
    module = "stage_setting_test",
    stages = {
        {
            id = "stage_test_1",
            tags = { "test" },
            pawns = {
                {
                    is_female = false,
                    pos_offset = { x = 0.0, y = 0.0 },
                    angle_offset = 0.0,
                    animtype = "player",
                }
            }
        },
        {
            id = "stage_test_2",
            tags = { "test" },
            pawns = {
                {
                    is_female = false,
                    pos_offset = { x = 0.0, y = 0.0 },
                    angle_offset = 0.0,
                    animtype = "player",
                }
            }
        }
    }
}

return anim_kit
There, now we have a specific animation kit for our stages. We can proceed, and create another Animation Kit. Which will have a special field called dependencies. This field should contain all the necessary modules that you need. This makes the Animation Kit only load after all the needed kits, and make sure that the elements we want are available.
test_road_kit.lua
local anim_kit = {
    VERSION = 1,
    module = "road_setting_test",
    roads = {
        {
            type = "SS", -- Stage to Stage
            from = {
                id = "stage_test_1",
                -- This field is necessary for the kit to find the correct stage.
                module = "stage_setting_test",
            },
            to = {
                id = "stage_test_2",
                module = "stage_setting_test",
            }
        }
    }
}

return anim_kit
With this, we were able to connect two Stages from a completely different kit! You can also do this with Phases and other Cells.
XML Generation
What? AnimNodes? XML files? WHAT XML FILES!? We don’t do those here!
I mean, we do, but not in your usual way.
If you ever modded Zomboid before, you might be familiar with AnimNodes. Which are files that are needed in order to animate characters. However, manually creating them often leads to an exponential amount of work thanks to the sheer quantity of animations we will need. Not to mention the high chance of doing mistakes during their creation.
Thankfully Depraved Sense got all that figured out for you! Instead of doing all the hard work youself, Depraved Sense generates all the necessary files as soon all the animations are loaded in game. This way you can focus more on the logic of your animations instead of breaking your head while dealing with XMLs, and making sure they are set up properly.
The XML Generation happens every time the game finishes loading its animation assets. And are all stored at common/media/AnimSets of Depraved Sense local files. These are also useful to check if your Animation Kits are working as intended.
Note: Due to a bug on how AnimNodes are loaded in Project Zomboid B42, a restart of the game is needed for the game to load the brand new files. You need to do this every time you generate new ones. Hopefully this bug can be fixed soon.
Lua Events
To make modding with Depraved Sense easier, the framework has a ton of Lua events in store for other modders to use. Here’s the list of them.
Shared Events
Shared events are events that are triggered both on Client, and Server.
OnGraphLoaded
Triggered when the graph finishes loading.
Parameters
| Name | Type | Notes |
|---|---|---|
| graph | DS_GraphManager | The graph itself |
Client Events
Events that are only triggered on the Client or Singleplayer.
OnCharacterEnteredBus
Triggered when a character enters an AnimBus.
Parameters
| Name | Type | Notes |
|---|---|---|
| character | IsoGameCharacter | The character entering the bus |
OnCharacterExitedBus
Triggered when a character exits an AnimBus.
Parameters
| Name | Type | Notes |
|---|---|---|
| character | IsoGameCharacter | The character exiting the bus |
OnDepravedDataModified
Triggered when the DepravedData of a character has been altered. Often by syncing the data from the Server.
Parameters
| Name | Type | Notes |
|---|---|---|
| data | DS_DepravedData | The DepravedData module |
| character | IsoGameCharacter | The character who had its data updated |
OnPlayerBitten
Triggered when a player was bitten. This is right before the damage is applied, but nothing will avoid the vanilla logic. if you want to change the logic itself, check media/lua/shared/DepravedSense/AnimEvents/zombie/OnZombieAttack.lua
Parameters
| Name | Type | Notes |
|---|---|---|
| player | IsoPlayer | The player that is being bitten |
OnCharacterHasClimaxed
Triggered when a character climaxes.
Parameters
| Name | Type | Notes |
|---|---|---|
| character | IsoGameCharacter | The character who climaxed |
Server Events
OnAnimBusCreated
Triggered when an AnimBus is created.
Parameters
| Name | Type | Notes |
|---|---|---|
| animbus | DS_AnimBus | The AnimBus itself |
OnAnimBusUpdated
Triggered when an AnimBus is updated.
Parameters
| Name | Type | Notes |
|---|---|---|
| animbus | DS_AnimBus | The updated AnimBus |
OnAnimBusRemoved
Triggered when an AnimBus is removed from the BusManager.
Parameters
| Name | Type | Notes |
|---|---|---|
| animbus | DS_AnimBus | The AnimBus itself |
OnActorForcedRemoval
Triggered when an Actor is forced out of an AnimBus. Often by external sources.
Parameters
| Name | Type | Notes |
|---|---|---|
| animbus | DS_AnimBus | The AnimBus itself |
| actor | DS_AnimActor | The actor that was forced out |
Calling The Events
In order to call these events, it is necessary to require the enum storing the events names. For example, this is how you would add an event call on the Server:
local ServerEvents = require("DepravedSense/Events/ServerEvents")

---@param animbus DS_AnimBus
local function cool_function(animbus)
	-- CODE!
end

-- Attention with the "[]"!

Events[ServerEvents.OnAnimBusCreated].Add(cool_function)
Custom Genitals
One of the features of Depraved Sense is having a modular way of handling animated genitals. It’s possible for players to choose their own prefered genital model if they dislike the base one. And without making every other player be forced to also change their own.
Anyone has the chance to create their own type, and register them for others to use. In here you will learn how to.
It is fairly expected that you have some basic knowledge of how to use Blender, the tool used in this guide.
Using The Base Model
To start making your custom genital, you need to first load BasePenis.glb onto blender. One thing to point out, is checking if is toggled on. Otherwise you might get duplicate vertices.
Note: If you prefer you can use the DepravedBodies.glb and use it referencing the main body.
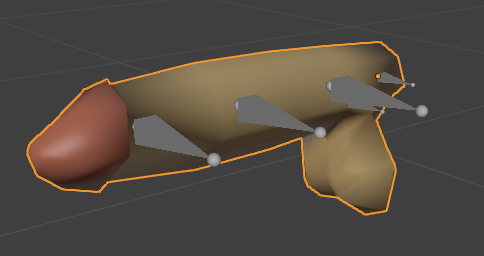
And, at this point, it is free reign. You can do about anything here, modify the current model, create one from scratch or even use another one at your disposal. As long as the model you use has the same armature from the BasePenis everything is okay!
In this example, we are going to simply create a joke genital by deforming the penis.
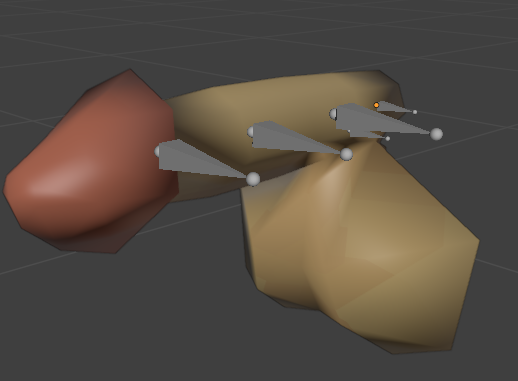
balls
When ready with your own creation, make sure to export it with glTF, and check if the needed objects are selected.
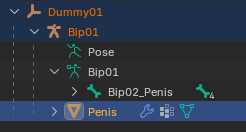
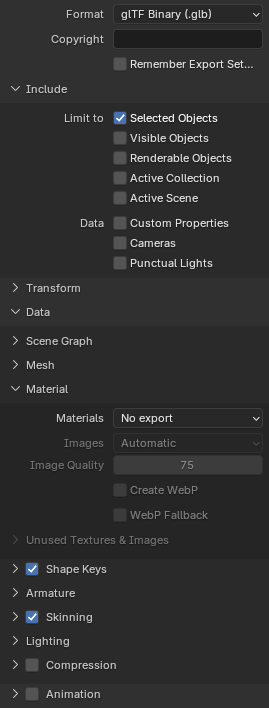
You will then store your precious model on common/media/models_X/genitals
Textures
Before we go any further, we also need to create texture variants to your genitalia. You can check the needed textures at common/media/texture/genitals folder.
It’s also good to use them in your own model while creating them.
DO NOT INSERT YOUR TEXTURES IN THE SAME FOLDER OF THE BASE ONES! Or else you will replace the current ones. Try creating a specific folder for them to make sure they don’t override existing ones. For example, in this case we created a folder named joke_type, and we’re going to store our textures there. Remember that folder’s name, it will become important real soon.
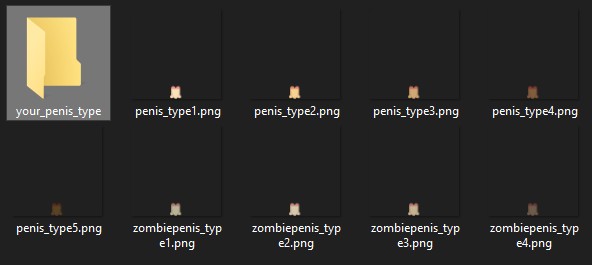
Creating The Genital Item
If you are not aware, penises are actually clothing items under the hood. Well, they aren’t clothes in theory, but in the game side, they are.
Item XML
At common/clothing/clothingItems we are going to create an XML file for our genital. But first, we need to generate an UUID code for our item. You can obtain a code in many ways, but in here we’re going to use this site to get ours. In this case we got 8c9f1a7e-e0a9-4b38-b8d1-fae6a93f0e0d. (UUID code is essentially a sequence of characters so random, that it practically makes our item unique.)
And as you may have guessed, the XML name also must be unique. Try naming it something very specific for your case. In here, we’re going to call it DS_TestBasePenis.xml
XML Format
This is the base format
<?xml version="1.0" encoding="utf-8"?>
<clothingItem>
	<m_MaleModel>genitals/PENIS_MODEL_NAME</m_MaleModel>
	<m_FemaleModel>genitals/PENIS_MODEL_NAME</m_FemaleModel>
	<m_GUID>YOUR_GENERATED_UUID</m_GUID>
	<m_Static>false</m_Static>
	<m_AllowRandomTint>false</m_AllowRandomTint>
	<m_AttachBone></m_AttachBone>
    <!--
        This is a texture that allows for the penis to be invisible
        when clothes are in the way.
    -->
	<textureChoices>invisible</textureChoices>
    <!--
        At this point, the texture paths in here will be used by the penis
        for different tints of the body.
        The paths are in relation to the `textures` folder.
    -->
	<textureChoices>genitals\YOUR_TYPE_FOLDER\penis_type1</textureChoices>
	<textureChoices>genitals\YOUR_TYPE_FOLDER\penis_type2</textureChoices>
	<textureChoices>genitals\YOUR_TYPE_FOLDER\penis_type3</textureChoices>
	<textureChoices>genitals\YOUR_TYPE_FOLDER\penis_type4</textureChoices>
	<textureChoices>genitals\YOUR_TYPE_FOLDER\penis_type5</textureChoices>
	<textureChoices>genitals\YOUR_TYPE_FOLDER\zombiepenis_type1</textureChoices>
	<textureChoices>genitals\YOUR_TYPE_FOLDER\zombiepenis_type2</textureChoices>
	<textureChoices>genitals\YOUR_TYPE_FOLDER\zombiepenis_type3</textureChoices>
	<textureChoices>genitals\YOUR_TYPE_FOLDER\zombiepenis_type4</textureChoices>
</clothingItem>
You can also check the exact XML parameters at the wiki
In our case the final XML will be:
<?xml version="1.0" encoding="utf-8"?>
<clothingItem>
	<m_MaleModel>genitals/JokeBasePenis</m_MaleModel>
	<m_FemaleModel>genitals/JokeBasePenis</m_FemaleModel>
	<m_GUID>8c9f1a7e-e0a9-4b38-b8d1-fae6a93f0e0d</m_GUID>
	<m_Static>false</m_Static>
	<m_AllowRandomTint>false</m_AllowRandomTint>
	<m_AttachBone></m_AttachBone>
	<textureChoices>invisible</textureChoices>
	<textureChoices>genitals\joke_type\penis_type1</textureChoices>
	<textureChoices>genitals\joke_type\penis_type2</textureChoices>
	<textureChoices>genitals\joke_type\penis_type3</textureChoices>
	<textureChoices>genitals\joke_type\penis_type4</textureChoices>
	<textureChoices>genitals\joke_type\penis_type5</textureChoices>
	<textureChoices>genitals\joke_type\zombiepenis_type1</textureChoices>
	<textureChoices>genitals\joke_type\zombiepenis_type2</textureChoices>
	<textureChoices>genitals\joke_type\zombiepenis_type3</textureChoices>
	<textureChoices>genitals\joke_type\zombiepenis_type4</textureChoices>
</clothingItem>
fileGuidTable
To make Project Zomboid read our xml, we actually need to inform it where it is located. We do it by creating a fileGuidTable.xml in our media root. This file is used by Zomboid to refer where our XML is and load it. In our specific case the file will end up being:
<?xml version="1.0" encoding="utf-8"?>
<fileGuidTable>
	<files>
		<path>media/clothing/clothingItems/JokePenis.xml</path>
		<guid>8c9f1a7e-e0a9-4b38-b8d1-fae6a93f0e0d</guid>
	</files>
</fileGuidTable>
Making the Item Script
Now, it’s time to create the clothing item itself for the game. Creating an item on itself is already a topic on its own, but in here we’re going to focus on using the base format for our genital.
First we need to create a script file at script/clothing, and in here we’re going to name it joke_penis.txt. Again, the file name NEEDS to be unique to avoid any override against other mods. More about item scripts in here.
module YOUR_MODULE_NAME
{
    item THE_NAME_OF_YOUR_PENIS_TYPE
    {
        DisplayName = Penis,
        DisplayCategory = Clothing,
        ItemType = base:clothing,
        Hidden = true,
        ClothingItem = THE_NAME_OF_ITS_XML,
        BodyLocation = base:dress,
        Tags = depravedsense:penis;depravedsense:genital,
    }
}
Translating to our case scenario:
module DepravedTest
{
    item JokePenis
    {
        DisplayName = Penis,
        DisplayCategory = Clothing,
        ItemType = base:clothing,
        Hidden = true,
        ClothingItem = JokePenis,
        BodyLocation = base:dress,
        Tags = depravedsense:penis;depravedsense:genital,
    }
}
The most important part of this script, is the tags, they are what makes it possible for Depraved Sense to find it when scanning characters. In here we are adding a penis, and genital tag.
Registering Our Genital
Alright, at this point our penis lives inside Project Zomboid, however we still need to register the item to Depraved Sense so it is possible for other players to use it in their characters.
Create a .lua file at media/lua/shared/YOUR_MOD_NAME/genital_registry.lua. Its name doesn’t need to be genital_registry.lua, it can be whatever name you want. But in this case we’re using that nomenclature.
To register our penis, we will require the GenitalsMap module of Depraved Sense, and register our genital based on our item script.
local GenitalsMap = require("DepravedSense/Genitals/GenitalsMap")

---The first parameter will be the name of our module at the script we just made,
---and the second parameter the name of our item type.
GenitalsMap.add_penis_item("DepravedTest", "JokePenis")
And… That’s it! If every step was followed correctly, your genital should be added to the game, and other people can use it at their pleasure!
Just look at this aberration we just added!
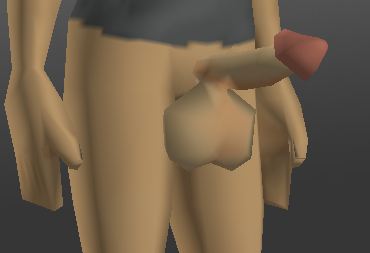
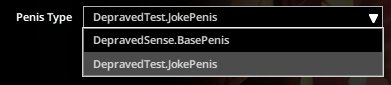
dear god.
Patching Models
Thanks to the way Depraved Sense needs an armature change for its main features like animated genitals, and belly to work. Every single model out there WILL need to be patched in order for those features to work properly. Or else people might get invisible genitals or static body parts.
So, in here you will learn how to do a simple patch for any model you wish to, with your OWN HANDS. We’re going to mainly use Blender as a 3D tool for our objective, but any other software that allows GLB/FBX files, and armature edit, will also work. Don’t worry, the steps are pretty simple if you tag along!
BUT! Before we go any further, it is highly recommended that you get permission of the original author as best as you can. Unless the model was abandoned, it is good practice to know when not to cross the line between stealing models without consent, to avoid any complicated discourse later on.
With that out of the way, let’s begin.
Loading The Model
First, we need a target model to apply our patch. Mods downloaded through the Steam Workshop mostly lie at Steam/steamapps/workshop/content/108600/WORKSHOP_ID_OF_THE_MOD/mods/MOD_NAME/, where the model itself is at MOD_NAME/42_or_common/media/models_X/Skinned, keep in mind that not every mod stays at that location, sometimes mods may stay at the cache folder or any outside place. Either way, make sure to localize MaleBody, FemaleBody, and if there is any, Male_Skeleton, and Female_Skeleton.
In this case we are gonna utilize the main vanilla model of Project Zomboid as a target, but let’s pretend it’s a modded one for this case scenario. First we open Blender (our chosen tool for this guide), and start a new session.
Now, let’s make sure we have a clean slate for ourselves. Press A (select all) on the screen, and then X (delete) to exclude all objects in our scene. Next step will be loading our target model. You can either click and drag the file to Blender, or go to File > Import > FBX or glTF.
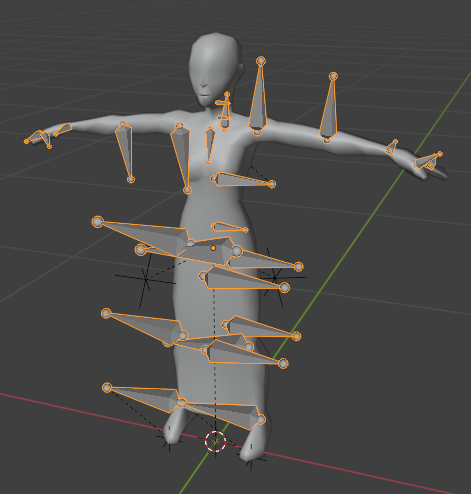
If done right, you might see a model similar to this. The bone shapes might look different, but if you see your model on Blender without any corrupt form, you are on the right track.
Choosing A Method
There are many ways of patching a Zomboid model. One of them is adding the new bones yourself manually and making sure their parenting is right. But in here we’re going to follow the easiest method, which is replacing the model’s armature completely. This method avoids possible small errors that a beginner with Blender can commit, not to mention that it is way faster at the end of the day.
Loading The New Armature
Repeat the same method when loading the character’s model, however this time with DepravedBodies.glb. When loading you will meet with 5 models inside the new armature structure.
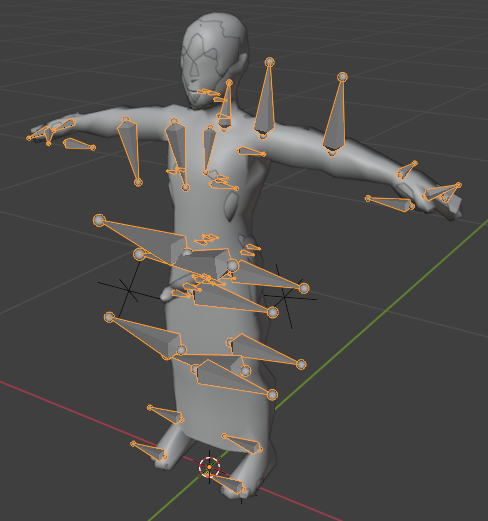
Most models here are for reference only, if you wish you can hide them.
Aligning
Now, we need to make sure that the new armature is at the right position in relation to the character’s model, so look for Bip01_Pelvis. We’re going to use that bone as our point to align our armatures. Make sure you’re in Object Mode on this step, and select any of the Bip01 armatures in the viewport, or in the explorer on the right (It might be named Bip01.001 if you’re selecting the new armature). Press Numpad 3 on your keyboard to view exactly one side of the armature, or alternatively go at the top of the screen and select View > Viewpoint > Right.
It is also recommended to use . on the keyboard to focus on the selected object (or View > Frame Selected). And to toggle Xray by pressing Alt + Z or clicking at the two squares at the top right. You can also hide the models to expose the armature better. The best mode for the viewport to do this is the Wireframe which can be set in the top right corner of the viewport.

With the armature now at fingertips you should see something like this if you followed things correctly. Don’t worry if things aren’t 100% accurate to your situation, as long as you can still control the armature’s position everything is okay.
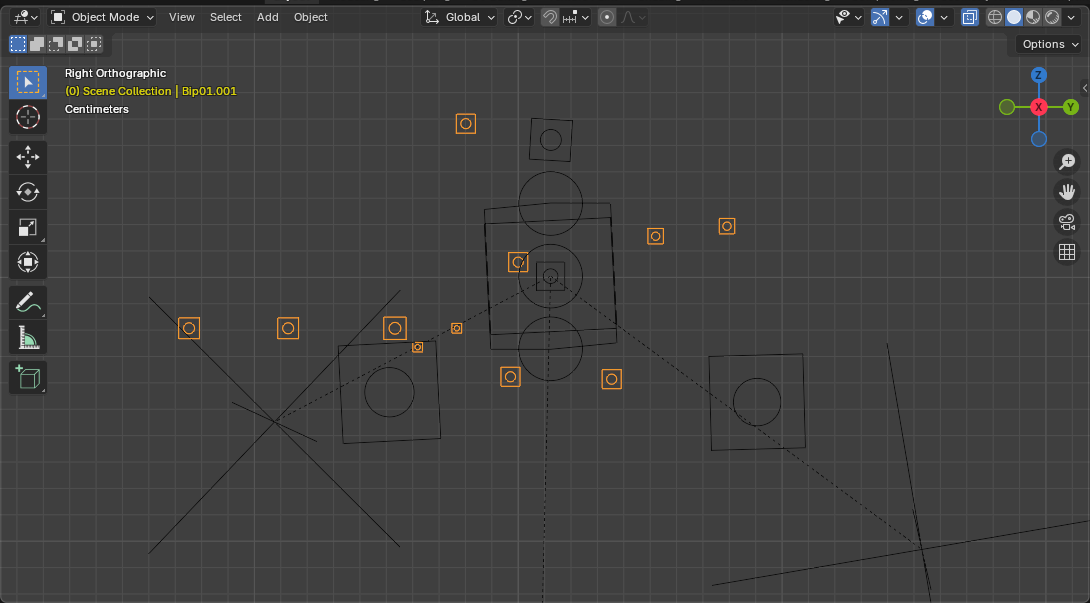
Our main objective now is to align the armatures. First you need to identify which of the bones is Bip01_Pelvis, and once you do, it’s time for action. Press G on your keyboard. It will allow you to move the armature according to your mouse. Then, move the Bip01_Pelvis right where the target is. It doesn’t need to be 100% exact, just close enough to the point to not notice any difference. Move with the Shift key held down to make more precise movements as you go.
Changing the view point to Front with Numpad 1 or View > Viewpoint > Front helps a ton.
Once done, both armatures should be aligned correctly.
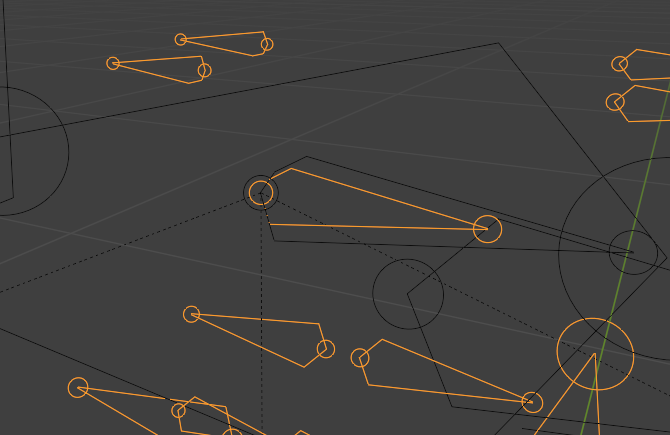
Note: In some rare cases some bones might be offset. You will need to check if everything is really aligned.
Reparenting the model
Since we got both our armatures aligned, it’s time for us to move our target model to its new armature. We can do this by selecting the model first then our new armature at the explorer by holding Ctrl.
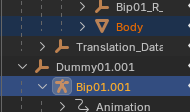
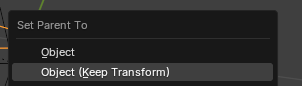
After selecting them, press Ctrl + p with the mouse on the viewport. A menu will appear asking how you want to change the parenting. Choose Object (Keep Transform). The transform ensures that the model won’t change positions when changing the armature.
Now, you need to change the target armature modifier to our own. Select the target model, go at its properties, and open the modifiers tab (the blue wrench icon). There you will see an armature modifier already in place. The next step is to change the object it is referencing to our new armature. In this case it is Bip01.001.
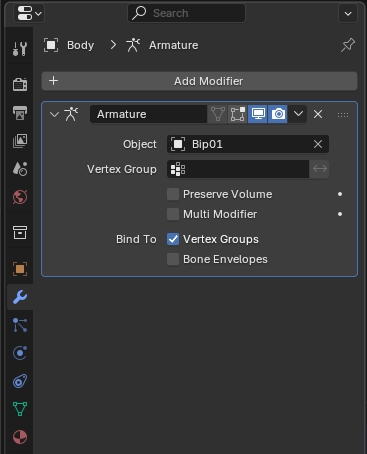
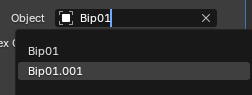
Doing this makes the model we are patching to use our new armature from this point on.
Object Deletion and Renaming
You might have noticed that our pack has repeated names like Bip01.001, and we still have the old one lurking around. What we need to do now is do a simple cleanup.
Select all the old objects from the old armature, and press X to delete them. After that go to our own object and remove the 001 from them. This way Zomboid will detect the model properly. In the end your final structure should be like this.
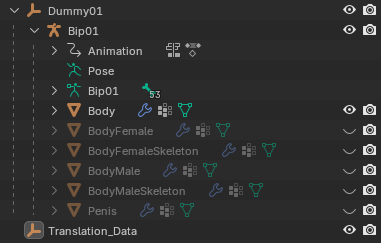
From this point on the model itself already has support for animated genitals! Penises should appear, and move as they are supposed to. However we are still not done yet. If we want more animated body parts like breasts, mouth, and support for belly deformation, we need to do one more extra step.
Weight Painting
Here it comes the most complicated part for the model, Weight Painting. If you’ve never done it before, it is recommended that you get the basics of how this tool works first to avoid some complications. But essentially, it is the method of adjusting how a model deforms with any specific bones.
We start by creating the necessary Vertex Groups for our new bones. You can find the section for it on the properties, and selecting the Green Triangle.

On the right you should see a section containing all Vertex Groups the model has. Click on the + sign on the right, and add Vertex Groups with the new bones you intend to Weight Paint. In this case we are going to start with Bip02_BellyMorph, the most complicated one to adjust.
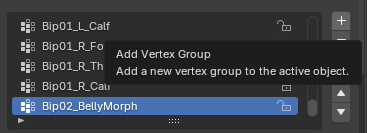
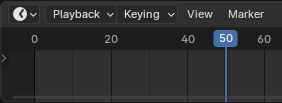
The DepravedBodies.glb we loaded should be used as a reference to how any bone should deform the model. If you’re patching a female model, it is recommended that you keep both female models visible in order to compare them. The models also came with an animation showing how far the Bip02_BellyMorph will go in game. So, make sure to go at the playback at the bottom, and place its playtime after 40 frames. This will position the bone at its final state, and you should see the model change with it.
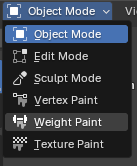
Select the target model, and switch to Weight Paint at the top left corner. (Make sure to enable mirroring on the top to make it symmetric)
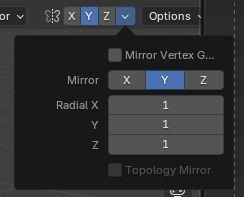
Now, all you need to do is select the Vertex Group of Bip02_BellyMorph to paint over the regions affected by that bone. Once you do, your job will be to align the belly morph in reference to our depraved model. (You can erase your paintings by holding Ctrl)
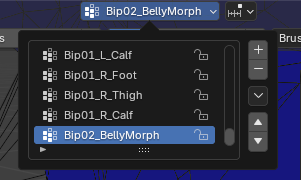
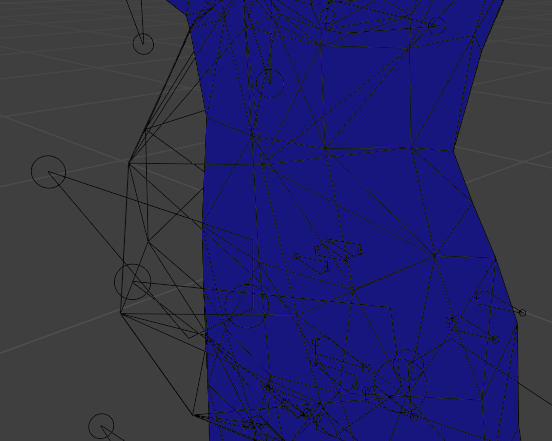
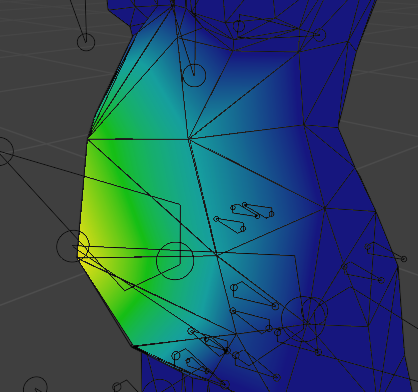
And done! You just finished Weight Painting a single bone. Now you need to do the same with all the rest of the Bip02 bones. Of course some are not going to be needed depending on the model, a good example is the female genital bones like Bip02_VaginaMorph.
Exporting The Model
Assuming you’ve got everything right, and the model patch is complete. You can finally export your own creation! First select the exact objects in this image by holding Ctrl.
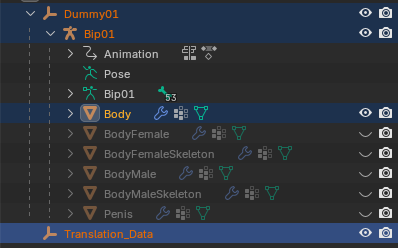
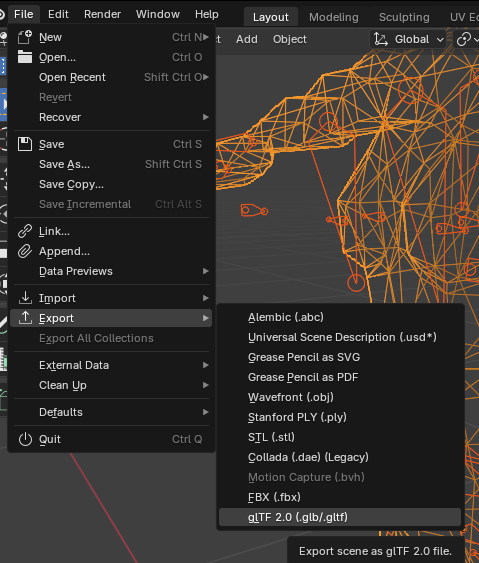
Now in the top left corner of Blender go to File > Export > glTF. And put this exact config for your export.
The file name matters a lot for Zomboid, as it dictates what model you are modifying. So, here’s a list of names to consider.
MaleBody for males.
FemaleBody for females.
Male_Skeleton and Female_Skeleton for skeletons.
Once exported, the model should be placed at media/models_X/Skinned in your mod’s folder.
Armature Merging (Manual Method)
In case you’re patching an animated rig or you prefer doing things your own way, you can load DepravedBodiesPatch.glb or DepravedBodiesAnimationPatch.glb if you are indeed patching an animation rig (The reason for this is that animations need a different transform set on the bones to work properly on the game). But before doing this method, you need to clean the armature itself.
It’s very common for mods to have unnecessary bones that just mess the armature structure, often being leaf bones called Nub or duplicated ones. These bones add nothing to the skeleton of the model, and NEED to be deleted if found.
So, you gotta make sure that the armature is a clean slate to make sure things go well. To do that first click on any bone on the screen, this will highlight all the bones of the model.
Then you need to go into Edit mode to be able to modify the bone structure. Go to the far up-left corner of your screen, and select Edit Mode. Or you can simply press Tab to quickly go into that mode.
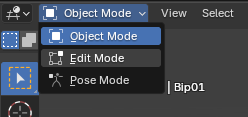
Now, let’s check the list of the vanilla structure. These are all the bones that the model should have.
Bip01
Bip01_Pelvis
Bip01_Spine
Bip01_Spine1
Bip01_Neck
Bip01_Head
Bip01_L_Clavicle
Bip01_L_UpperArm
Bip01_L_Forearm
Bip01_L_Hand
Bip01_L_Finger0
Bip01_L_Finger1
Bip01_R_Clavicle
Bip01_R_UpperArm
Bip01_R_Forearm
Bip01_R_Hand
Bip01_R_Finger0
Bip01_R_Finger1
Bip01_BackPack
Bip01_L_Thigh
Bip01_L_Calf
Bip01_L_Foot
Bip01_L_Toe0
Bip01_R_Thigh
Bip01_R_Calf
Bip01_R_Foot
Bip01_R_Toe0
Bip01_DressFront
Bip01_DressFront02
Bip01_DressBack
Bip01_DressBack02
Bip01_Prop1
Bip01_Prop2
Translation_Data
Note: On animation rigs it is common to have control bones that are specialized on moving the root ones. You can leave those intact.
You gotta make sure the model doesn’t have any extra things outside of it. One thing to note is that Project Zomboid treats everything as a bone, including objects that aren’t in the armature. So you got to make sure you take those into account.
At this point you should try to find any extra bones on the armature. In most cases they have Nub at the end of their name, but it can vary. You can use the search bar at the explorer in the right tab. Once you find an outsider bone, move your mouse on top of the bone on the screen, and press X to delete it. With enough patience, the model should be clean eventually.
The patch armature too has an extra bone called neutral_bone. That bone is only there to ensure that the pack armature stays correct. You should also delete that bone.

Once you’re ready you can merge both the patch armature, and the vanilla one by selecting the patch first, the target second, then pressing Ctrl + J to join them together.
Conclusion
And there you have it. At this point you should get a grasp on what to do to patch other models out there to make it compatible with Depraved Sense. Of course some steps are complicated to manage, and some problems arise out of thin air. If you’re having any problems with this workflow, don’t be scared to ask for help at the LoversLab Forums, and on the Discord!